Paint Correction Guide: Types, Process, Cost & Duration in San Jose
Your car's paint isn't going to fix itself. Swirl marks, scratches, oxidation – they all add up over time until your car looks tired and dull.
Paint correction can reverse that damage, but it's not magic. It's a mechanical process that removes a thin layer of clear coat to eliminate imperfections and restore that factory-fresh shine.
This guide covers everything: what paint correction actually does, how the 1-step, 2-step, and 3-step processes differ, how long each takes, and what you should do after to protect your investment.
What is Paint Correction?
Paint correction is the process of removing surface imperfections from your car's clear coat using specialized polishing machines, pads, and compounds.
What it removes:
- Swirl marks (those spider-web patterns you see in sunlight)
- Light to moderate scratches
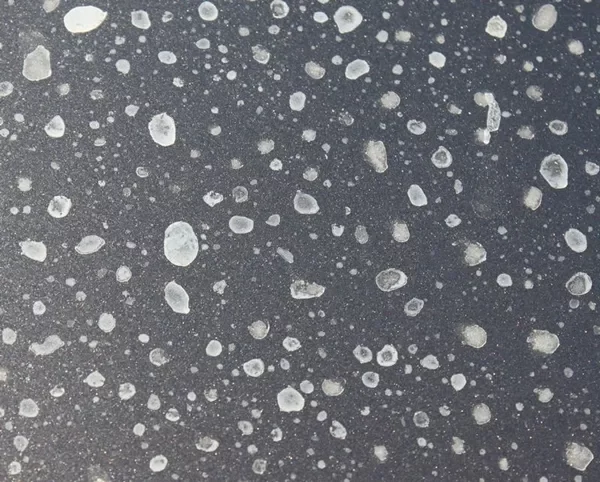
- Water spots and etching
- Oxidation and fading
- Holograms from bad polishing jobs
- Micro-marring from automatic car washes
What it doesn't remove:
- Deep scratches through the clear coat
- Rock chips
- Dents or dings
- Paint transfer from other vehicles
Paint correction isn't filling in scratches with wax. It's actually removing microscopic layers of clear coat to level the surface. Once those imperfections are gone, light reflects evenly off the paint, giving you that deep, mirror-like shine.
How Paint Correction Actually Works
Think of your car's clear coat like a sheet of glass. New cars have perfectly smooth glass. Over time, that glass gets scratched up from washing, road debris, and environmental damage.
Paint correction is like sanding and polishing that glass until it's smooth again.
The science: Your car has three layers of paint:
- Primer (protects the metal)
- Base coat (the actual color)
- Clear coat (protective top layer, usually 4-5 mils thick)
Most defects you see are in the clear coat. Paint correction removes tiny amounts of clear coat – measured in microns – to eliminate those defects.
We use a paint depth gauge throughout the process to make sure we're not removing too much. Most vehicles have 4-5 millimeters of clear coat to work with. If previous detailers have already polished your car multiple times, there may be less material left.
Paint Correction Stages Explained
Paint correction isn't one-size-fits-all. The process you need depends on your paint's current condition.
1-Step Paint Correction
Best for: Light swirl marks, minor oxidation, newer cars
What it does: Single polishing stage using a finishing polish and soft pad. Removes 25-30% of minor defects.
Time required: 3-5 hours depending on vehicle size
Results: Noticeable improvement in gloss and clarity. Light swirls and hazing mostly eliminated.
Cost: $245-$345 (sedan to large SUV)
When to choose it:
- Your car is relatively new (1-3 years old)
- Paint has minor swirl marks from washing
- You maintain your car regularly
- You want a quick refresh before ceramic coating
Limitations: Won't remove deeper scratches or heavy oxidation. Think of it as a "correction lite" that addresses surface-level issues.
2-Step Paint Correction
Best for: Moderate swirl marks, visible scratches, cars 3-7 years old
What it does: Two-stage process using different pads and compounds:
- Stage 1 (Compounding): Aggressive compound removes 60-75% of defects
- Stage 2 (Polishing): Finer polish refines the finish and removes any haze left from compounding
Time required: 5-8 hours for most vehicles
Results: Dramatic improvement. Most swirl marks, light scratches, and oxidation removed. Paint looks nearly perfect.
Cost: $365-$395 (sedan to large SUV)
When to choose it:
- Moderate to heavy swirl marks visible in direct sunlight
- Clear scratches from key marks or shopping cart incidents
- Paint that looks dull or faded
- Preparing for sale (maximizes resale value)
Process details:
Stage 1 - Compounding:
Uses aggressive cutting compounds and microfiber pads to remove the bulk of defects. This stage cuts into the clear coat more than 1-step, so we're careful to monitor paint thickness.
Common compounds used: heavy-duty abrasive products paired with firm pads to level the clear coat surface.
Stage 2 - Polishing:
Switches to finer polishes and softer pads to refine the surface. This removes any haze or micro-marring left behind by the compounding stage and brings out deep gloss.
Between stages, we wipe down with isopropyl alcohol to remove polishing oils and inspect our work under specialized lighting.
3-Step Paint Correction (Full Correction)
Best for: Heavy swirl marks, deep scratches, severely neglected paint, show cars
What it does: The most thorough correction process available:
- Stage 1 (Heavy Compounding): Removes 80-90% of defects, including wet sanding for deeper scratches
- Stage 2 (Polishing): Refines the surface and removes compounding marks
- Stage 3 (Final Polish): Ultra-fine polish for maximum gloss and optical clarity
Time required: 1-2 full days
Results: Near-perfect paint. 80-95% of all defects removed. Looks better than factory fresh.
Cost: $596-$795 (sedan to large SUV)
When to choose it:
- Severe swirl marks covering the entire vehicle
- Deep scratches that haven't gone through the clear coat
- Heavy oxidation or sun damage
- Preparing a show car or collector vehicle
- Paint that's been neglected for years
Process details:
Stage 1 - Heavy Cutting:
Uses the most aggressive compounds and may include spot wet sanding for deeper scratches. Wet sanding uses ultra-fine sandpaper (2000-3000 grit) with water to level deeper imperfections before polishing.
This stage is technique-intensive. We work on small sections at a time, constantly inspecting and adjusting pressure, speed, and pad selection.
Stage 2 - Compounding:
Removes marks left by heavy cutting or wet sanding. Uses medium-cut compounds to further refine the surface.
Stage 3 - Finishing:
Ultra-fine polish (like V38 Optical Grade products) removes any remaining micro-marring and achieves supreme optical clarity. This is where we bring out that deep, wet-looking gloss.
Important: 3-step correction removes more clear coat than lighter processes. We use a paint depth gauge constantly to ensure we're staying within safe limits. Most vehicles can only handle 2-3 full corrections in their lifetime before the clear coat becomes too thin.
How Long Does Paint Correction Take?
Quick answer: 3 hours to 2 full days, depending on the process and paint condition.
Factors that affect timing:
Paint Condition
A garage-kept car with minor swirls? Much faster than a daily driver with years of automatic car wash damage.
If your paint has embedded contaminants (tar, sap, iron fallout), decontamination adds 1-2 hours before we even start polishing.
Vehicle Size
- Small sedan: Base timing
- Large SUV/truck: Add 2-3 hours
- Exotic/sports cars: Complex curves add time
Correction Level
- 1-step: 3-5 hours
- 2-step: 5-8 hours
- 3-step: 8-16 hours (usually spans 2 days)
Previous Damage
Cars that have been through body shop work often have uneven clear coat thickness or previous bad buffing jobs. These require extra care and time.
Time Breakdown by Stage:
Typical 2-step correction timeline:
- Wash and decontamination: 1-1.5 hours
- Clay bar treatment: 30-45 minutes
- Stage 1 compounding: 2-3 hours
- Stage 2 polishing: 2-3 hours
- Final wipe down and inspection: 30 minutes
- Protection application (wax/sealant): 30-45 minutes
Total: 6-8 hours
We don't rush paint correction. Taking shortcuts leads to:
- Uneven results
- Buffer trails
- Holograms
- Burned-through clear coat
Anyone offering same-day 3-step correction is cutting corners somewhere.
The Paint Correction Process: Step-by-Step
Here's exactly what happens when you bring your car in for paint correction.
Step 1: Decontamination (1-2 hours)
Paint correction can't start on dirty paint. First, we remove everything that standard washing misses.
Wash: Two-bucket method using pH-neutral shampoo. Removes surface dirt and grime.
Iron removal: Spray-on iron remover dissolves embedded brake dust, rail dust, and industrial fallout. You'll see it turn purple as it works.
Clay bar treatment: Glides over the paint surface, lifting and removing bonded contaminants like tree sap, tar, bugs, and overspray. If you run your hand across your paint and it feels textured or rough, it needs clay bar treatment.
Why this matters: Contaminants stuck to paint will be dragged across the surface during polishing, creating new scratches. Clean paint = safer polishing.
Learn more about clay bar treatment →
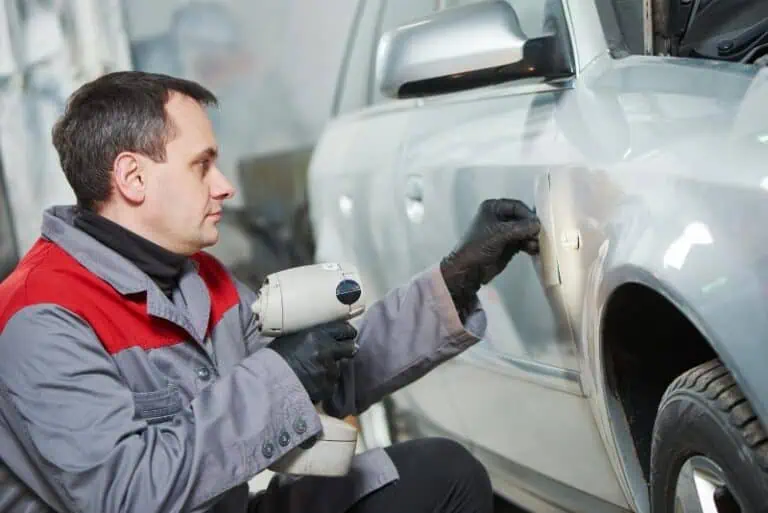
Step 2: Paint Inspection & Measurement
Before polishing, we inspect your paint under multiple lighting conditions:
- LED inspection lights
- Halogen lights (different kelvin temperatures)
- Direct sunlight
Different lights reveal different defects. What looks good under LED might show holograms under sunlight.
We also use a paint depth gauge to measure clear coat thickness across all panels. This tells us:
- How much correction is safe to do
- Which areas need extra caution
- If previous work has thinned the clear coat
Step 3: Masking & Prep
We mask off trim, rubber seals, badges, and emblems to prevent polish from getting caught in crevices or staining plastic trim.
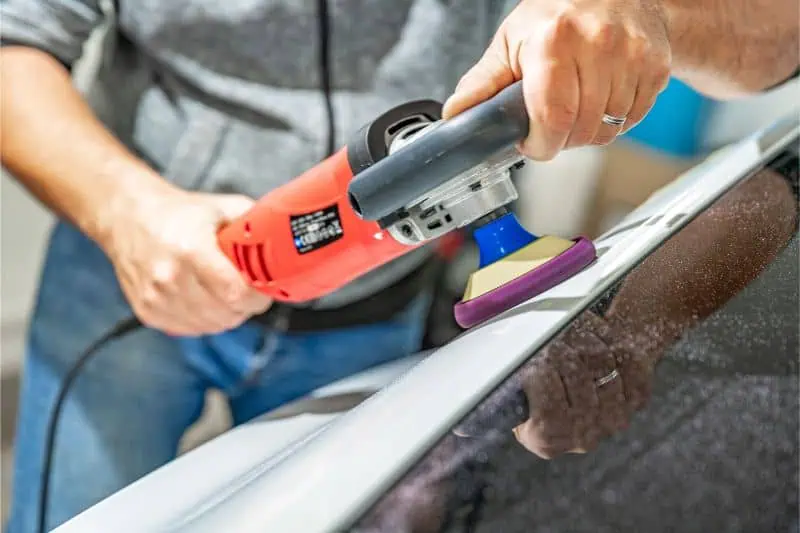
Step 4: Compounding (2-4 hours)
The heavy lifting. This stage removes the bulk of defects.
Tools used:
- Rotary polisher or dual-action (DA) orbital machine
- Aggressive cutting pads (microfiber or firm foam)
- Heavy-cut compounds
Technique: We work on one panel at a time, usually in 2x2 foot sections. Multiple passes with overlapping coverage ensure even correction.
What's happening: The compound contains abrasive particles that physically cut into the clear coat. Combined with the friction from the spinning pad, we're removing microns of material to level the surface.
Inspection: After each panel, we wipe it clean and inspect under LED lights. If defects remain, we do another pass.
Step 5: Polishing (2-3 hours)
Refining stage. Removes any haze or micro-scratches left by compounding.
Tools used:
- Softer polishing pads
- Medium to fine polishes
- Slower machine speeds
Goal: Bring out gloss and clarity while removing marks from the previous stage.
Step 6: Final Polish (1-2 hours for 3-step only)
Ultra-fine polish for supreme optical clarity.
Tools used:
- Finishing pads (ultra-soft foam)
- Jeweling polish or optical-grade final polish
- Very light pressure
This stage creates that deep, liquid-like gloss you see on show cars.
Step 7: IPA Wipe Down
We wipe down the entire vehicle with isopropyl alcohol (IPA) mixed with distilled water. This removes all polishing oils left on the surface.
Why this matters: If you're applying ceramic coating or PPF after correction, the surface must be completely oil-free or the protection won't bond properly.
Step 8: Protection Application
Paint correction removes defects, but it doesn't protect against new ones. The freshly corrected paint is actually more vulnerable because we've removed some of the protective clear coat.
Options:
- Wax: 2-4 months protection, easy to apply
- Sealant: 4-6 months protection, better durability
- Ceramic coating: 1-5 years protection, maximum durability
Most customers pair paint correction with ceramic coating. Why fix your paint perfectly only to let it get damaged again?
What to Use After Paint Correction
Paint correction exposes fresh clear coat. Without protection, it'll get damaged again within weeks.
Option 1: Car Wax
Duration: 2-4 months
Cost: Included in most correction packages
Best for: Budget-conscious customers or those who like waxing their cars
Pros:
- Easy to apply and remove
- Nice shine
- Affordable
Cons:
- Wears off quickly
- Needs reapplication 4-6 times per year
- Doesn't offer much scratch resistance
Option 2: Paint Sealant
Duration: 4-6 months
Cost: Usually included or minimal upcharge
Best for: Those who want better protection than wax without committing to ceramic coating
Pros:
- Lasts longer than wax
- Better chemical resistance
- Good water beading
Cons:
- Still needs frequent reapplication
- Not as durable as ceramic coating
Option 3: Ceramic Coating (Recommended)
Duration: 1-5 years depending on package
Cost: $595-$995 (see our ceramic coating packages)
Best for: Anyone who wants to maintain that perfect finish long-term
Why we recommend it:
You just spent hours and hundreds of dollars making your paint perfect. Ceramic coating locks in that perfection for years, not months.
Benefits:
- 9H hardness (scratch resistant, not scratch proof)
- Extreme hydrophobic properties (water flies off)
- UV protection prevents fading
- Chemical resistance (bird droppings, tree sap don't etch)
- Easier washing (dirt doesn't stick)
- 50% reduction in washing time
The process: Ceramic coating is applied immediately after paint correction while the surface is still perfectly clean. The coating chemically bonds to the clear coat, creating a permanent protective layer.
Learn more about why we use SystemX ceramic coating →
Option 4: Paint Protection Film + Ceramic Coating
Best for: High-end vehicles, cars driven on highways, maximum protection
The combo: Paint protection film on high-impact areas (front bumper, hood, mirrors) + ceramic coating everywhere else.
PPF protects against physical damage (rock chips, scratches). Ceramic coating protects against chemical damage and makes everything easier to clean.
You can even apply ceramic coating over PPF for enhanced gloss and easier maintenance.
How Long Does Paint Correction Last?
The correction itself is permanent. The defects we remove are gone forever (unless new damage occurs).
But your paint will get damaged again over time. How long the "perfect" finish lasts depends entirely on how you maintain it.
With Proper Protection & Maintenance:
Ceramic coated after correction:
- 3-5 years before needing minor touch-up correction
- Paint stays glossy and protected
- Minimal new swirl marks
Wax or sealant after correction:
- 6-12 months before minor swirls start reappearing
- Requires regular reapplication of protection
- More vulnerable to environmental damage
No protection after correction:
- 1-3 months before new swirl marks appear
- First automatic car wash will undo some of your work
- Environmental damage starts immediately
Factors That Shorten Correction Results:
Automatic car washes are the #1 killer of freshly corrected paint. Those spinning brushes will put swirls right back into your paint.
Improper washing technique at home. Using dirty mitts, wrong products, or circular motions creates new swirls.
Parking outside exposes paint to UV rays, bird droppings, tree sap, and pollen – all of which will etch into unprotected clear coat.
Road conditions matter. Highway driving exposes your car to more debris, salt, and grime than city driving.
No protection means your freshly corrected paint has zero defense against damage.
How to Maintain Corrected Paint:
- Apply protection immediately (ceramic coating recommended)
- Hand wash only using two-bucket method
- Use pH-neutral soap designed for cars
- Soft microfiber wash mitts only (never sponges or brushes)
- Wash in straight lines, not circles
- Dry with clean microfiber towels or forced-air blowers
- Park in garage or covered area when possible
- Remove bird droppings immediately (acidic, will etch paint)
Follow these rules and your correction will stay looking fresh for years.
Paint Correction Cost in San Jose
Our paint correction pricing is based on process level and vehicle size:
1-Step Paint Correction
- Sedan: $245
- SUV: $265
- Large SUV/Truck: $345
Includes: Wash, decontamination, clay bar, single-stage correction, sealant application
2-Step Paint Correction
- Sedan: $365
- SUV: $385
- Large SUV/Truck: $395
Includes: Everything in 1-step plus dual-stage compounding and polishing, removes 60-75% of defects
3-Step Paint Correction (Full Correction)
- Sedan: $596
- SUV: $675
- Large SUV/Truck: $795
Includes: Complete multi-stage correction, spot wet sanding for deep scratches, removes 80-95% of defects
Add-On Services:
Ceramic coating after correction:
- 1-year: Starting at $595
- 3-year: Starting at $795
- 5-year: Starting at $995
Headlight restoration: $75-$125 (commonly needed on older vehicles)
Engine bay detailing: $95-$150
Why paint correction costs what it does:
It's not the products (compounds and pads are relatively cheap). It's the time, skill, and equipment required.
- Time: 3-16 hours of hands-on work
- Skill: Years of training to know how much clear coat to remove safely
- Equipment: Professional-grade polishers, multiple pads, compounds, inspection lights, paint depth gauges
- Risk: We're responsible if something goes wrong
Cheap paint correction usually means:
- Rushed work
- Inexperienced detailer
- Consumer-grade equipment
- Skipped decontamination steps
- No paint depth measurement (risky!)
We've fixed dozens of bad correction jobs from cheap detailers. The cost to fix a burned-through clear coat (repaint) is $1,500-$3,000+ per panel.
Get a free paint inspection and quote →
Paint Correction FAQs
Can paint correction fix all scratches?
Only scratches within the clear coat. If you can catch your fingernail in the scratch, it's likely too deep for correction alone.
Deep scratches that go through the clear coat into the base coat require touch-up paint or repainting.
How many times can you paint correct a car?
Most vehicles can handle 2-3 full corrections in their lifetime. Each correction removes clear coat, and eventually, you'll have too little left.
This is why we measure paint thickness before and during correction.
Will paint correction damage my car?
Not when done properly by trained professionals. We use paint depth gauges to ensure we stay within safe limits.
DIY paint correction by inexperienced people? That can definitely cause damage – usually by burning through the clear coat or creating holograms.
Can I do paint correction myself?
Technically yes, but we don't recommend it unless you have proper training and equipment.
Risks of DIY correction:
- Burning through clear coat (can't be undone, requires repaint)
- Creating holograms (holographic effect from improper technique)
- Uneven results
- High spots (dried compound that becomes permanent)
If you attempt DIY:
- Start with the least aggressive products
- Practice on an inconspicuous area first
- Use a paint depth gauge
- Work in the shade
- Take your time
That said, most people who try DIY correction once hire a professional the second time.
Do new cars need paint correction?
Often yes. New cars get handled rough at dealerships:
- Improper washing with dirty mitts
- Automatic car washes before delivery
- Cars rubbing against each other during transport
- Hasty "detail" jobs at the lot
We regularly correct brand-new cars before ceramic coating. Even fresh-from-factory paint has imperfections.
What's the difference between paint correction and buffing?
"Buffing" is a vague term that can mean anything from adding wax to heavy compounding.
Paint correction is specific: removing defects by leveling the clear coat. True correction doesn't use fillers – it actually fixes the problem.
Some shops call it "buffing" when they're just applying glaze (product with fillers that temporarily mask scratches). That washes away after 2-3 washes.
Can paint correction remove water spots?
Yes, if they're in the clear coat. Paint correction excels at removing etching from water spots, especially those left by hard water from sprinklers.
If water spots have etched deep enough to damage the base coat, correction can minimize but not completely eliminate them.
How soon after correction can I wash my car?
Depends on what protection you applied:
- Wax/sealant: Can wash after 24 hours
- Ceramic coating: Wait 7 days minimum (coating needs time to cure)
Does paint correction remove orange peel?
Orange peel (the texture that makes paint look like orange skin) can be reduced with wet sanding, but this is aggressive and risky.
Minor orange peel smoothing: possible
Complete orange peel removal: requires paint shop work
Paint Correction vs Other Services
Paint Correction vs Polishing
Paint correction specifically removes defects. It's measured, methodical, and permanent.
Polishing is a general term that can mean anything from light buffing to full correction. When shops say "polish," ask specifically what defects they'll remove and what process they use.
Paint Correction vs Detailing
Detailing is thorough cleaning of the entire vehicle – inside and out.
Paint correction is a specialized paint restoration process. It's often part of premium detail packages but requires separate pricing and timing.
Standard detail: 2-4 hours
Detail + paint correction: 5-10+ hours
Paint Correction vs Ceramic Coating
They work together, not separately.
Paint correction: Removes defects
Ceramic coating: Prevents new defects
You should always do paint correction before ceramic coating. Coating seals in whatever condition the paint is in – you want that condition to be perfect.
Why Choose Nor Bay Mobile Detailing
10+ years experience correcting paint on everything from daily drivers to exotic cars
Professional equipment: Rotary and DA polishers, LED and halogen inspection lights, paint depth gauges, full compound and pad selection
Certified installers: SystemX ceramic coating certified, trained on proper correction techniques
Mobile or shop service: We can come to you for basic packages, or you bring the car to our shop for multi-day correction
Honest recommendations: If your paint doesn't need 3-step correction, we'll tell you. If correction isn't the right solution, we'll explain why.
Real warranty: Our work is guaranteed. If we make a mistake, we fix it.
Book Your Paint Correction
Free paint inspection to assess your car's current condition and recommend the right correction level.
Schedule correction:
- Book paint correction service →
- Get a free quote →
- Call us: (408) 373-3614
Related services:
- Ceramic coating (recommended after correction)
- Paint protection film (PPF) for high-impact areas
- Full detail packages with correction included
- Oxidation removal for severely sun-damaged paint
- Headlight restoration (often needed with correction)
Serving San Jose and the Bay Area: Mountain View, Sunnyvale, Cupertino, Los Gatos, Saratoga, Campbell, Cambrian Park, Los Altos, Palo Alto, Menlo Park, Almaden, Berryessa, Rose Garden, Ponderosa Park, Monte Sereno, Rivermark and throughout Santa Clara County.